65| The Sword Observation Process

This chapter explains the process for handling the sword examination.

  1. Wear white gloves or hold a handkerchief in both hands.

how-to-handle-sword-1.jpg

  1. Lightly bow.  Hold the tsuka (hilt) with your right hand and the saya (scabbard) with your left hand.  Keep the back of the saya facing downward, and the ha facing up.  The mune should rest on the inside of the saya.  Carefully pull the blade out.  Do not let the ha touch the inside wall of the saya to avoid scratches.

How to handle sword 2

  1. .  Place the saya to the left of the sword.  Prepare the sword tool.

How to handle sword 3

  1. . Push out the mekugi (peg) from the tsuka using the sword tool. 

How to handle sword 4

5. Place the mekugi into the tsuka hole to prevent it from losing it.

How to handle sword 5

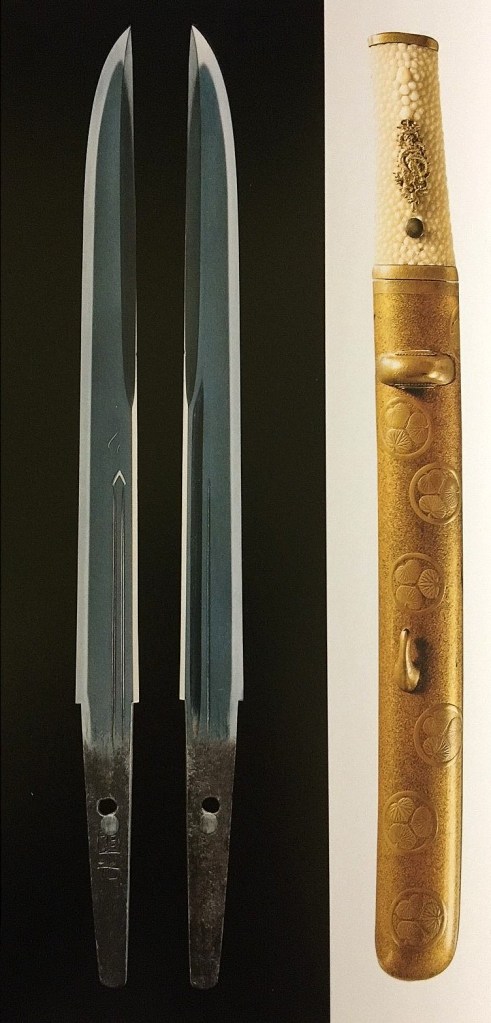
6.   Remove the habaki (the gold metal square piece above the tsuka) and set it on the right. 

How to handle sword 6.a  How to handle sword 6

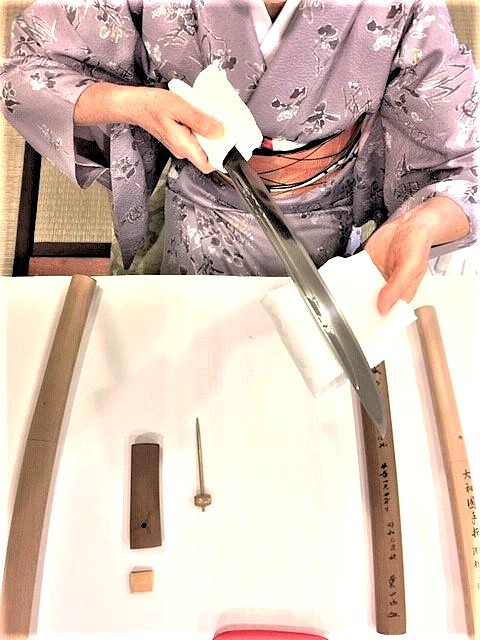
  1.   Hold the nakago in your right hand.  Support the blade from underneath with your left hand using washi (Japanese rice paper), a handkerchief, or tissue paper.


  1. Use light reflection on the blade’s surface, examine the jigane, hamon, boshi, mei, and other features.  To observe the hamon, jigane, and boshi clearly, move the sword up, down, or sideways, or rotate it to reflect the light at the proper angle.

1悦子の絵

  1. When you finish examining the sword, bow lightly, and put it back together by reversing the order process.


46|Part 2 of — 12|Middle Kamakura Period: Tanto 鎌倉中期短刀

This chapter is a datiled part of chapter of 12| Middle Kamakura Period Tanto ( 短刀) .  Please read Chapter 12 before reading this section.

0-timeline - size 24 Middle Kamakura

                   The circle above indicates the time we discuss in this section


In Chapter 12, Middle Kamakura Period: Tanto, it is described that the tanto shape called takenoko-zori appeared during the middle Kamakura period.  This type of tanto  curves slightly inward at the tip.  The drawing below may be somewhat exaggerated to show the curve.  The actual curvature of the takenoko-zori is not very noticeable.  Perhaps only a few millimeters inward. 

Usually, the length of a tanto is around 12 inches.  Tantos are categorized as follows: if it is approximately ten inches, it is called a josun tanto (定寸短刀), longer than ten inches is called a sun-nobi tanto (寸延び短刀), and shorter than ten inches is called a sun-zumari tanto (寸詰短刀).

12Tanto drawing Mid Kamakur

Sun-nobi Tanto (寸延び)   >   Jyosun Tanto (定寸)   >  sun-zumari Tanto (寸詰り)  (longer than 10 inches)           (approx. 10 inches)                (less than 10 inches

13 «Part 2» Tanto photo

 46 Shintogo Kunimitsu Oshigata

Shintogo Kunimitsu (新藤五国光)  Sano Museum Catalogue, permission granted to use

The style above is called kanmuri-otoshi (冠落); the mune side (opposite side of the  cutting edge) is shaved off.  The length is approx. 10 inches: woodgrain pattern surface  with nie on ji (refer to Chapter 3, Names of parts).   Very finely forgedThe hamon is a medium suguha (straight).  The boshi is ko-maru (small round).  Due to the kanmuri-otoshi style, it may not be easy to see the takenoko-zori; the mune side slightly bends inward.  Shintogo Kunimitsu is regarded as the top tanto maker.

13 «Part 2»Tanto photo with Saya

The above photo is also by Shintogo Kunimitsu (新藤五国光) with Saya.  Saya is the scabbard.  The handle of the scabbard (white part) is made of sharkskin.  Both photos are from the  Sano Museum Catalog “Reborn.”  Permission granted.