As part of the sword study, it is necessary to describe the process of making a sword. This chapter explains the basic procedure of sword-making. It provides a brief overview of the sword-making process, as I lack expertise in the field.
When I was little, I watched the process of metal being heated in the furnace at my father’s factory. He owned a machine tool company and a forging plant. It was fascinating to see the metal heat up, be taken out of the furnace, pounded by two men, then put back in the furnace and pounded again and again. To this day, I can still remember the exact color of the metal when it should be removed from the fire. That was a strange thing for a little girl to learn. Also, it was dangerous for children to be near the furnace when the metal was being heated. But in those days, people’s idea of safety was different.
I think the factory workers enjoyed seeing my brother and me, who were so impressed, amazed, and looked up to them as heroes. We kept visiting the shop until my father moved the factory to a larger location. Today, I would never allow my grandchildren to be near a furnace.
Sword-making involves many detailed processes, and each swordsmith has his own secrets. For those interested in more detailed explanations, please refer to a book written by a famous swordsmith, Mr. Yoshihara Yoshindo, and a DVD produced by his son. Their information is listed below. Mr. Yoshihara’s book is available on Amazon. And the DVD is available on Amazon Japan. To purchase the DVD, you may need to use a proxy service, like Zen Market, since it is sold on Amazon Japan.
Book: The Art of the Japanese Sword: The Craft of Sword Making and Its Appreciation by Yoshihara Yoshindo, Leon, and Hiroko Capp. Published by Tuttle Publishing
DVD: Katana/On Ko So Shin (温故創新)——-Katana project by Yoshihara Yoshikazu (吉原義一). Use the proxy service Zen Market, as only Amazon Japan sells it.
Tamahagane (玉鋼)
In the early days of sword-making, swordsmiths extracted iron from iron sand and refined it themselves for sword material. By the Kamakura period (see the timeline above), ironmaking was done by separate entities. Swordsmiths bought iron known as “Tamahagane” from ironmakers. Tamahagane is an essential part of sword-making. It is iron produced using the tatara process, a unique Japanese smelting method.

Tama-Hagane from Mr. Yoshihara
Kawa-gane (側鉄) and Shin-gane (芯鉄 )
The Japanese sword is made from steel with two different hardness levels: kawa-gane for the outer steel and shin-gane for the inner steel. Kawa-gane is the harder steel, with about 0.6% carbon content. Shin-gane is a softer steel, with about 0.25% carbon content. Japanese swords are constructed with softer steel inside, wrapped around by harder steel; this design makes them resistant to bending and breaking.
Kawa-gane (側鉄: outer steel) —— Shita-gitae (下鍛: Base forging)
Heat a block of tamahagane → Strike it with a hammer to create flat pieces → While the tamahagane is still hot, quickly quench it in water → Break it into small pieces.
Forge a rectangular plate separately with tamahagane → attach this plate to a handle or lever to make a teko → carefully and closely attach the previously broken metal pieces onto the teko.

→ Cover the stacked tamahagane with ashes and clay for protection → Heat it in the furnace → Remove it from the furnace and strike it with a hammer → Repeat this process multiple times to stretch the tamahagane to about twice its original length.
While the tamahagane is still hot, make a notch in the center and fold it in half. → Continue the same process of heating, hammering to stretch, and folding it in half (alternating widthwise and lengthwise, 6 or 7 times, depending on the original carbon level in tamahagane). This process reduces the carbon content to the desired level.
Kawagane (側鉄: Outer steel) —– Age-gitae (上鍛: Finish forging )
At the end of shita-gitae, chisel the block of tamahagane so that it can be separated into two or three sections → Quench in water → Cool down → Break it into pieces along the markings → Combine these pieces, and repeat the heating, hammering, and folding processes.
Usually, the folding process happens 6 to 7 times for shita-gitae (base forging) and 6 to 7 times for age-gitae (finish forging). The total is about 12 times, depending on the original carbon content in the tamahagane used. This process is for kawa-gane (側金).
Purpose of heating hammering and folding
- Each time the heating and folding process is done, tamahagane loses some of its carbon content. For outer steel, the ideal carbon content should be about 0.6%. If the carbon content is too high, the steel is hard, so the sword may crack. If it is too low, the sword will be too soft and may bend. Swordsmiths rely on their eyes to judge the correct level of carbon content. This is the professionalism and the artistry of sword-making.
- Removing slag and impurities from tamahagane.
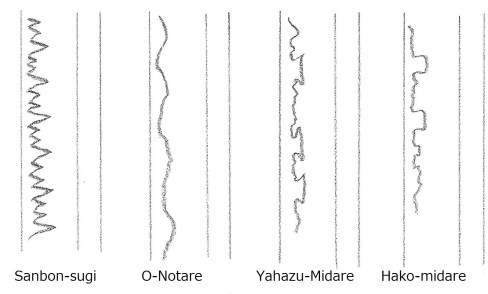
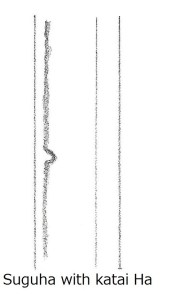
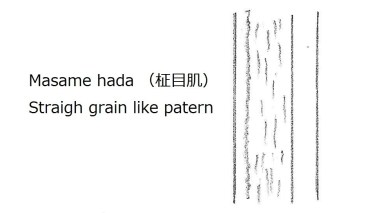
- Each heating and folding process creates multiple layers of thin steel that form the ji-hada pattern (surface designs such as wood grain, burl look, straight grain, or a combination of these).
Shin-gane (inner steel 芯鉄)
Shin-gane is the inner metal, which is a softer steel with less carbon. Having a softer inside makes the sword more flexible. Having a hard outer steel with higher carbon and softer steel inside prevents the sword from cracking or breaking. To make the shin-gane, mix softer steel with tamahagane. Repeat the same process as you would with kawa-gane.
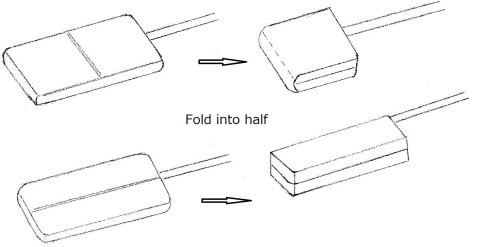
Tsukuri-komi (造り込み) Sunobe (素延)
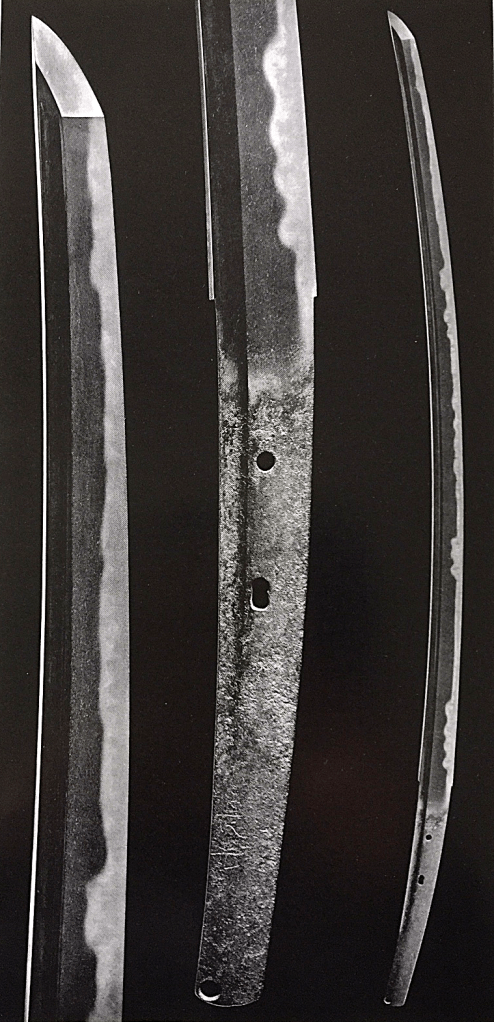
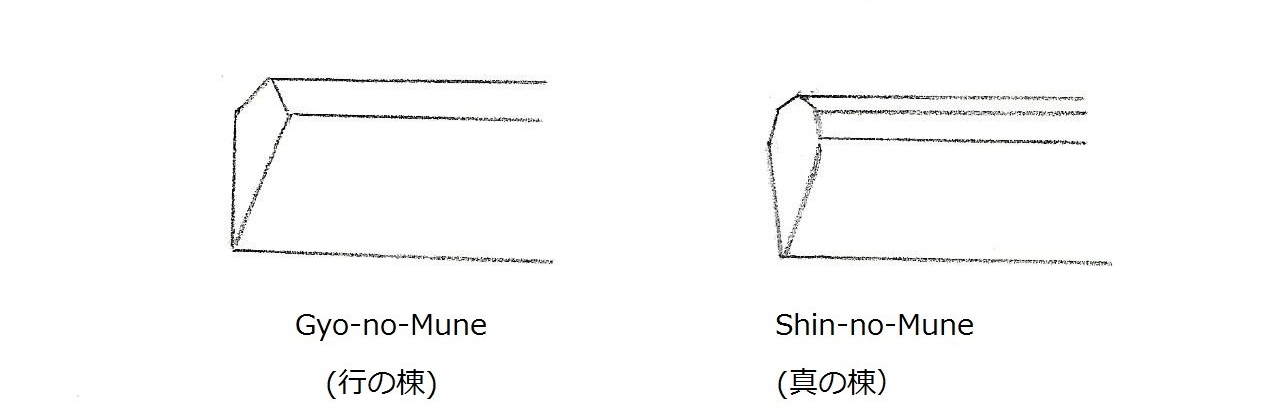
Wrap the shin-gane with the kawa-gane, then weld the two pieces together by heating, hammering, and stretching to form a steel bar. There are several ways to wrap the shin-gane, but the most common is called kobuse (甲伏). The illustration below shows a cross-section.

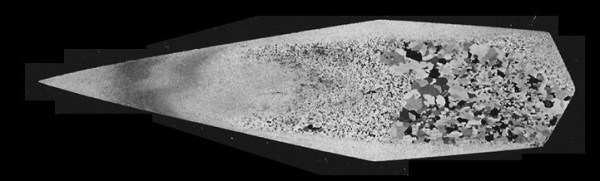
The photo above (taken by my husband) shows a cross-section of a sword. Many years ago, a member of our sword club gave us a very rusty, damaged sword. My husband cut the blade and took a micro photo of the cross-section. This sword has a more complex construction than the usual kobuse method. It appears to have three or four different hardnesses of steel. It seems that this sword was once one of the finest made by a top sword-maker.
Hizukuri (火造)
Hizukuri is the process of shaping the final form of the sword from sunobe through heating and hammering. At this stage, the ha (cutting edge) becomes thinner, the shinogi side rises higher, and the sword’s shape begins to take form.
Arashiage (荒仕上げ)
This process is a rough finish.
Tsuchitori (土取)
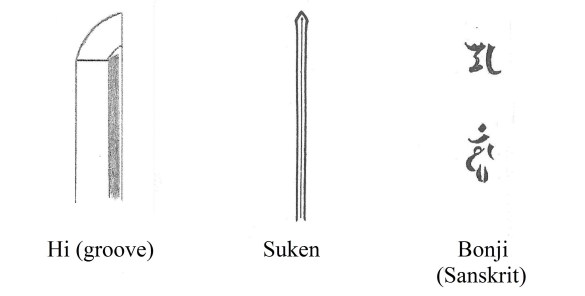
Mix clay, pine tree ash, ground stone, and water. Coat the sword with this muddy mixture. Scrape off a thin layer of the mixture slightly around the hamon area, then let it dry. By doing the tsuchitori process, the hamon is created, and the cutting edge hardens at the same time.
Yaki-Ire (焼入れ)
After the muddy paste dries, heat the sword evenly in the furnace. Judging by the color of the heated sword, pull it out of the furnace and quickly quench it in water. Usually, this process is done after sunset so that the swordsmith can see the metal’s color and gauge the heated sword’s temperature more accurately. This is the most critical step, as all the work done up to this point can be ruined if he fails to judge the heated sword’s precise color, water temperature, and the timing of quenching.
The final step is to send the sword to a polisher. The polisher, called a togishi, polishes and sharpens the blade. He brings out the beauty of the surface and the sword’s sharpness. This completes the entire sword-making process. Every step is crucial, but the polisher’s final work is just as important as all the other stages.

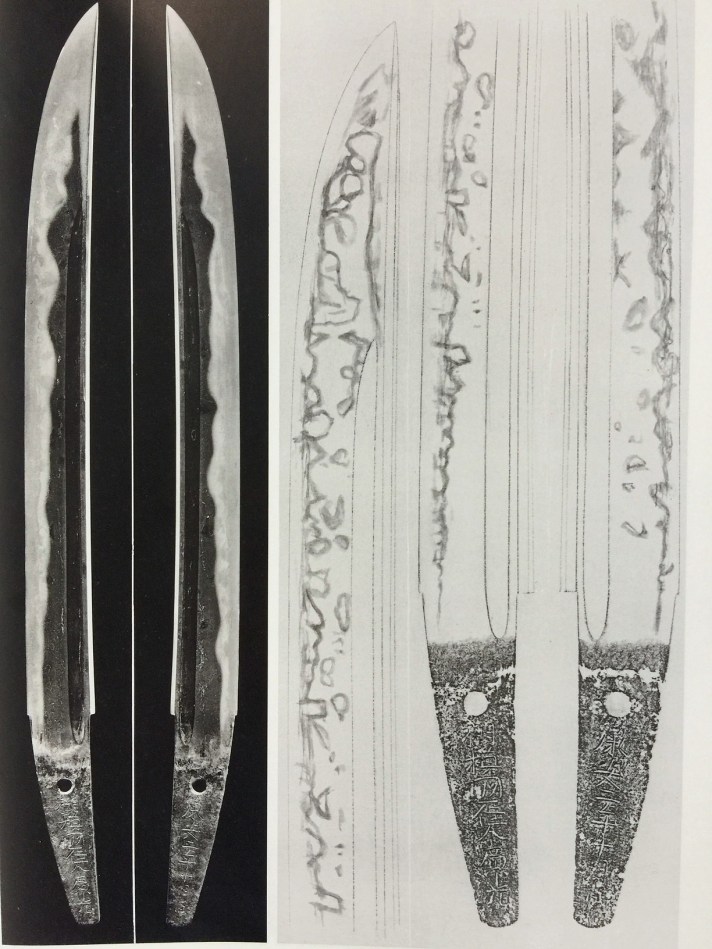
 Bishu Osafune Moromitsu (備州長船師光) from Sano Museum Catalogue ((permission granted)


 The above photo is from the official website of the Terukuni Jinja Shrine in Kyushu.


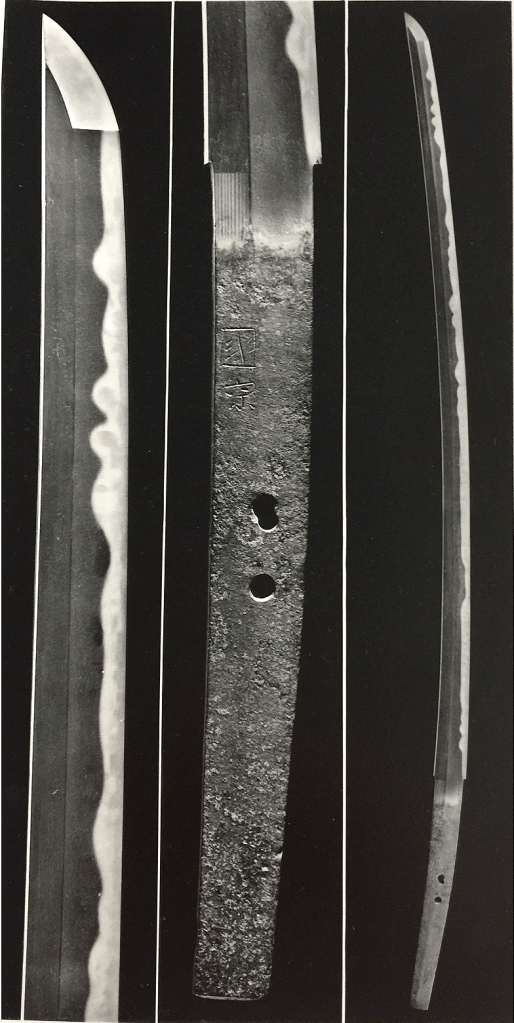
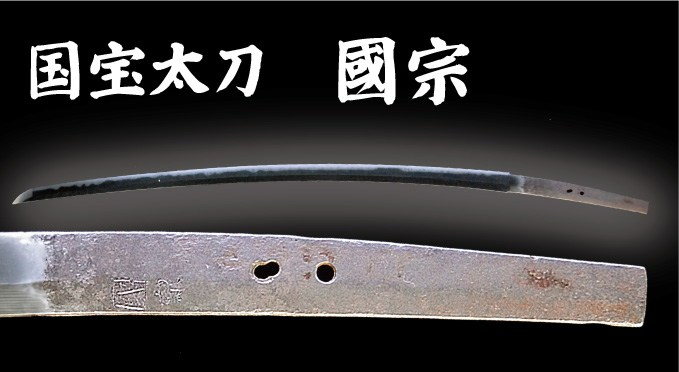
 来国光(Rai Kunimitsu)

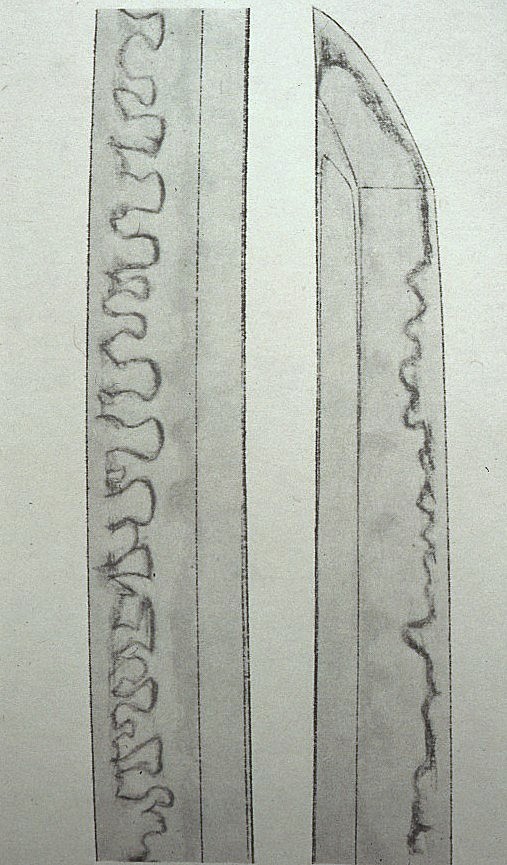
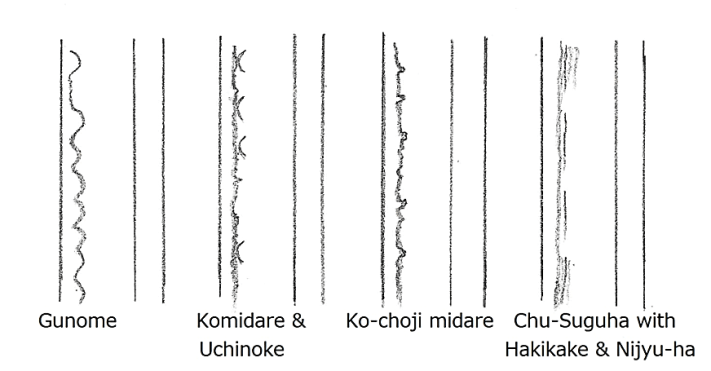
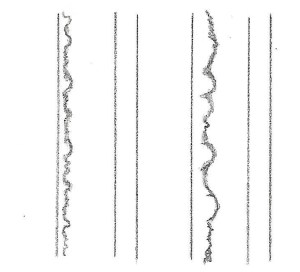
 Kawazuko-choji O-choji Ko-choji Suguha-choji (tadpole head) (large clove) (small clove) (straight and clove)
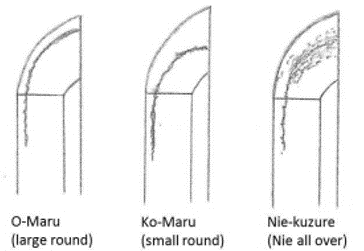
 Sansaku-boshi